Some people can experience difficulties installing the Nvidia privative drivers, this howto explains in better detail how to reach that.
Introduction
The correct way to install the privative drivers in a Debian system is by using their own provided packages
- nouveau module should not be loaded
- have the kernel headers installed to compile the module
- install the correct packages & versions to use
- module is compiled and loaded with modprobe
- maybe you need to add an /etc/X11/xorg.conf* template to make it working
- you may want to better check official instructions for debian NvidiaGraphicsDrivers - Debian Wiki
Tool provided by Elive:
The tool provided by Elive makes all the process to just follow a few questions and guides the user, installing and doing everything needed for him.
Please report any modification to the tool if needed in order to work easily and automated for everybody
The live mode boots, when an nvidia card is detected it shows a dialog asking to the user if wants to install the privative drivers, eventually is needed to reboot with a different boot option (privative drivers) in order to not load the nouveau driver, which will conflict with the other nvidia driver and it wont work (everything is guided from the nvidia installer)
When the user is proceding with the installation of the drivers, it shows different driver versions to select, every graphic card would need a different version, the installer suggest a recommended one, but if not works you must try with the other versions too.
Next steps of the tool is:
- install the required packages
- which compiles the driver module
- then try to load the module
- if everything is fine, the Live mode continues and starts the graphical system
- if fails, it proceed with removing the privative drivers to switch back to the opensource option (nouveau) and continue the boot
If the drivers succeed and eventually the user runs the installing of elive to the hard disk, the same nvidia option is used for the installed system
Auto / guided installation
 Boot in Live mode and just follow the instructions


Manual installation
Live mode
If you have the option "privative drivers" before to boot, you must select this one in order to not use the nouveau driver to proceed with the use of the privative ones, both drivers cannot be loaded at the same time
Optionally you can press TAB or "e" to edit the boot parameters and append "nox11autologin" to run the tool yourself manually
Elive already Installed on the hard disk
- Boot the computer select Advanced / Recovery mode
- Login as root from the provided console
- Make sure that the module "nouveau" is not loaded, using "lsmod | grep nouveau"
- if is loaded, you must reboot and press the "e" key in the boot menu to edit the bootloader and add the boot parameter "modprobe.blacklist=nouveau", then press F10 to boot in this mode
- run the tool 'nvidia-privative-drivers-install'
- if the driver was correctly installed and loaded, try to run the graphical system with "startx" or "service lightdm start"
- update your initrd with "update-initramfs -k all -c"
- reboot
2nd option:
Do not run the Elive provided tool and try to make it working entirely by yourself, if you are successfull and the provided tool by Elive don't worked, report what it needs to be added to it
Extra
The Elive tool automates all the needed steps process, but it may be not perfect, so maybe trying to install the drivers there's a missing package to install or step to add. You must open a temporal console / terminal if says that it failed in order to check the package / drivers status and try to make it working yourself, then, report to elive the improvements needed to the tool in order to make it working by default and for everybody.
Tips:
- Update to the last version of the tool before to use it, which may include fixes or improvements:
apui elive-tools
Installing the Official Nvidia drivers
(from their website)
You can also use the .run file provided by the official nvidia drivers from their website, this should work in most of the cases and will be newer versions of the drivers, but we don't suggest to use them unless really needed, because:
- we want to make the provided drivers by Elive to work for everybody, so helping to improve them instead will help everybody
- the installation is not as clean as you do it from packages (which you can remove), and your resulting system can be more dirty with files installed (this is not totally wrong if you simply use your computer for yourself, in any case, you can always reinstall very easily Elive in upgrade-mode)
So, after that said, let's proceed with the instructions ![]()
Installing:
- Go to the nvidia website and download their .run file to install the drivers, select the details of your system, OS, architecture, and card model if needed...
- Open it from your file-manager and double-click to the .run file, Elive has special helpers to run it in the correct way

Now, you may have some issues installing them, so let's explain them and their solutions:
Causes and solution for the .run installer:
Old drivers installed:
So you may have some nvidia drivers already installed from the elive tool
To remove them, use our magic tool:
~ ❯❯❯ sudo nvidia-privative-drivers-install -u
Nouveau driver already in use:
Your computer may have booted normally and detected that you have an nvidia card, and so it loaded the nouveau module, the problem is that unless you set "vga=788" or similar parameter, the module will be in use, and so you won't be able to "rmmod nouveau", this makes the installing (or switching) to the other nvidia driver not possible...
To solve that, turn ON your computer and in the first boot menu selector, press the "e" key to edit your grub menu, go to the boot parameters and append "modprobe.blacklist=nouveau" to the line starting with the word "linux", like here:
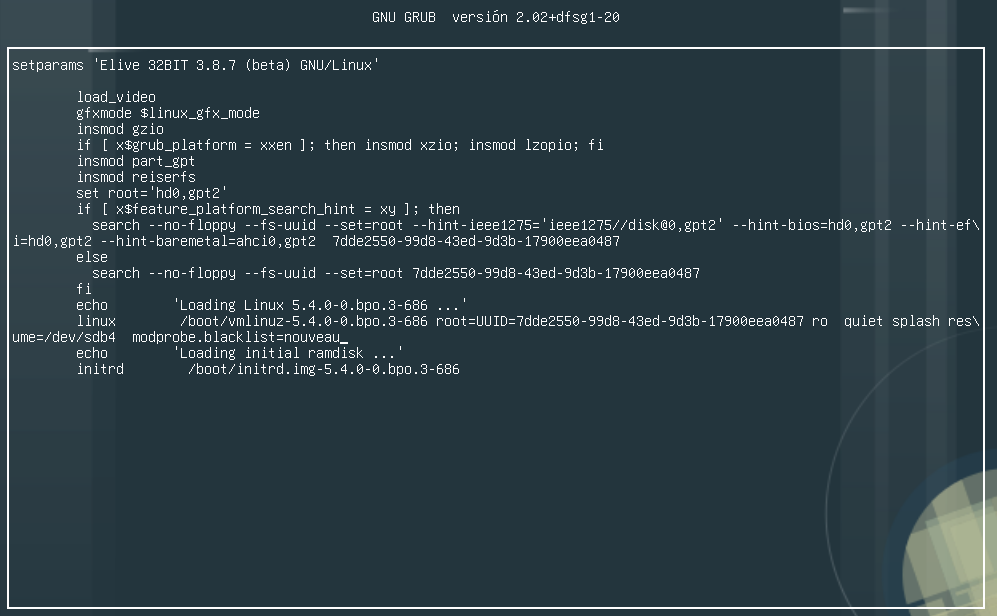
It is also suggested to remove the "quiet" and "splash" parameters to have more messages in your consoles
Finally, press the F10 key to boot using your modifications
IMPORTANT: Since you are not booting with your correct drivers installed, your graphical system may fail to start, so you would need to do everything from the console first. To boot in console mode just append the number "1" to the end of your grub list (like explained before), it will ask you for your admin (root) password and then you can do everything from it
Be free to improve this howto with better instructions